Wednesday, 22 May 2013
MESYUARAT SARANA PIBG
PERHATIAN;
Satu mesyuarat Sarana PIBG bagi ibu bapa murid Tahun 3 akan diadakan pada 25 Mei 2013. Mohon semua ibu bapa yang berkenaan hadir ke mesyuarat tersebut.
Drp YDP PIBG
SK St Stephen, Bau
Monday, 6 May 2013
SK St. Stephen, 94000 Bau
Selamat Datang ke halaman web rasmi Sekolah Rendah Kebangsaan Saint Stephen (M) Bau, Sarawak.
Halaman yang menyediakan informasi berkenaan dengan sekolah ini.
Terimakasih kerana sudi meluangkan sedikit masa melawat halaman web ini.
Pihak sekolah amat mengalu-alukan kunjungan anda. Semoga anda berpuas hati dengan layaran anda dan selamat maju jaya.
Halaman yang menyediakan informasi berkenaan dengan sekolah ini.
Terimakasih kerana sudi meluangkan sedikit masa melawat halaman web ini.
Pihak sekolah amat mengalu-alukan kunjungan anda. Semoga anda berpuas hati dengan layaran anda dan selamat maju jaya.
Monday, 18 June 2012
Blogger Getting Started Guide for Teachers & Staffs of SK St Stephen
Blogger Getting Started Guide
Blogger Getting Started Guide
How to publish a blog post
How to create and edit pages
Manage comments on your blog
Import and export your blog
How to publish a blog post
How to create and edit pages
Manage comments on your blog
Import and export your blog
Entering St Stephen's site
To start a post in St Stephen's site, visit the Blogger homepage, enter your username and password, and click Sign in.
Start blogging now!
Start blogging now!
Write your post
Once you've signed in to Blogger, you'll see your dashboard with your list of blogs. Here's what you need to do:
- Click the orange pencil icon to write a new post, and enter anything you want to share with the world.
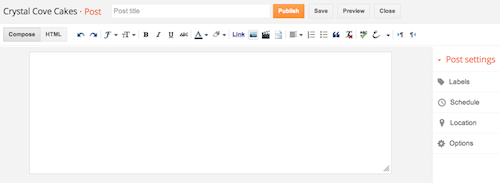
- Next, you'll see the Post Editor page. Start by giving your post a title (optional), then enter the post itself:

- When you're done, click the Preview button at the top to make sure it's ready to go, and then click the Publish button to publish your post.
Add an image
You can add an image from your computer or the Web to your blog. Click the image icon in the Post Editor toolbar. A window appears prompting you to browse for an image file on your computer, or enter the URL of an image on the Web.
Once you've selected your image, you can then choose a layout to determine how your image will appear in your post:
- The 'Left', 'Center', and 'Right' options allow you to customize the way your blog text will flow around your image.
- The 'Image size' options will determine how large the image will appear within your post.
Add a video
To add a video to your blog post, click the film strip icon in the Post Editor toolbar above where you compose your blog text. A window appears prompting you to 'Add a video to your blog post.'Click Browse to select the video file from your computer that you'd like to upload. Note that Blogger accepts AVI, MPEG, QuickTime, Real and Windows Media files and that your video must be less than 100MB in size.
Before uploading your video, add a title in the 'Video Title' box and agree to the Terms and Conditions (you'll only have to do this the first time that you upload a video with Blogger). Then click UPLOAD VIDEO.
While your video uploads, you'll see a placeholder in the post editor showing where your video will appear. You'll also see a status message below the post editor letting you know that your upload is in progress. Depending on the size of your video, this usually takes about five minutes. When it is complete, your video will appear in the post editor.
Blogger's post editor
Blogger's post editor has three modes:

 Features, from left-to-right:
- Compose: a wysiwyg mode where you manipulate text with formatting buttons
- Edit HTML: a raw mode where you edit the html manually
- Preview: renders a full-body preview of the post, including its Title, links and images
- Undo
- Redo
- Font
- Font size
- Headings
- Bold
- Italic
- Strikethrough
- Font color
- Background color
- Link
- Image
- Video
- Jumpbreak
- Justify text
- Ordered (numbered) list
- Unordered (bullet) list
- Blockquote
- Spell check
- Upload image
- Remove formatting from selection
Subscribe to:
Comments (Atom)

